Tag Archives: css

Infragistics WebSplitter: Set SplitterBar’s CSS class in clinet-side JavaScript

Hello there. Haven’t written in a while, been busy participating in Stack Overflow community, but this little bit I found interesting.

Infragistics has a cool versatile Web Splitter control in their ASP.NET suite, but recently I encountered a shortcoming – there’s no way to set a CSS class for splitter bar on client-side via JavaScript. On server-side you can do something like

xMySplitter.SplitterBar.CssClass = "hiddenElement";

On client-side – you can get the CSS class via

var sCss = $find('xMySplitter').get_splitterBarCss()

but there’s no counterpart set_splitterBarCss() method. Continue reading →

WebDataMenu: Use your own hover

Infragistics WebDataMenu comes with variety of styles and lets you specify your own. At a very basic it allows you to specify styles for normal menu items and hovered menu items:

<ig:WebDataMenu ID="xwdmMyMenu" runat="server">
   <ItemSettings CssClass="MenuItem" HoverCssClass="MenuItemHover"/>
</ig:WebDataMenu>

This markup can correspond to CSS classes, for example:

.MenuItem {
   background-image:none;
   background-color:white;
}

.MenuItemHover{
   background-color:rgb(213,224,198);
}

This works fine in most cases, but since the hover/unhover is done via JavaScript sometimes there’re issues. Continue reading →

Infragistics WebDataGrid: Hidden columns become visible after AJAX postback

A recent update to .NetAdvantage for ASP.NET v12.2 introduced a weird bug – hidden columns of WebDataGrid and WHDG become visible after postback. Service release 12.2.20122.2031 fixed that issue – but only for full postback. Under some circumstances if grid performs an AJAX call (sorting, paging etc.) hidden columns become visible again. This does not happen in IE, but other browsers, such as Chrome and FireFox do exhibit the issue.

This is happening because hidden columns lose “display:none” property in their style. If this happens to you – you have to take matter in your own hands. Continue reading →

WHDG: Position “Group by” area anywhere on the page

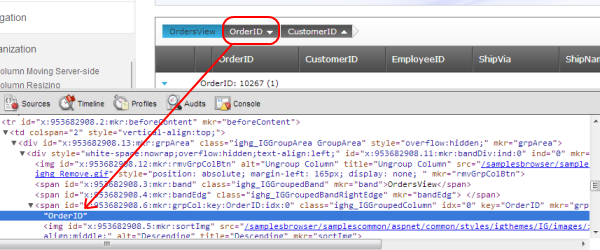
WebHierarchicalDataGrid grouping feature offers handy “Group By” area – a place where columns can be dragged to for grouping. It has one limitation though: by default it can be positioned only on top or the bottom of the grid. But what if you want to place it elsewhere? For example you have a dedicated navigation part of your page where you want to display grouped columns.

DOM to the rescue. As I mentioned in my previous post Group By area is a DIV that can be located by its CSS class name (either assigned by you or, barring that, class of a StyleSet used by the grid control). After the area is located, it can be moved to a location of your choice, for example another DIV by standard appendChild DOM method:

function positionGroupByArea() {
   var aGroupAreas = document.getElementsByClassName('ighg_Office2007BlueGroupArea'); 
   var oDivActionControls = $get('xdivNavigation'); 

   if (aGroupAreas.length > 1) {
      oDivActionControls.removeChild(aGroupAreas[0]);
      oDivActionControls.appendChild(aGroupAreas[1])
   } else {
      oDivActionControls.appendChild(aGroupAreas[0])
   }
}

Lines 2-3 Locate Group By area and target DIV respectfully. Note Line 5: like nature abhors a vacuum – WHDG abhors Group By area missing from its default place, if it is missing – grid will try to recreate it. If this happens you will have 2 Group By areas. If code on Line 5 detects this situation it removes old area and re-adds new one. Otherwise it simple moves original area.

You will have to call this code on initial grid load and after every grid operation (sorting, paging etc.) since grid will try to recreate Group By at the old place. Also, if the grid feels jumpy during this move – hide Group By area initially via it’s CSS class by setting display:none and make it visible again after the move.

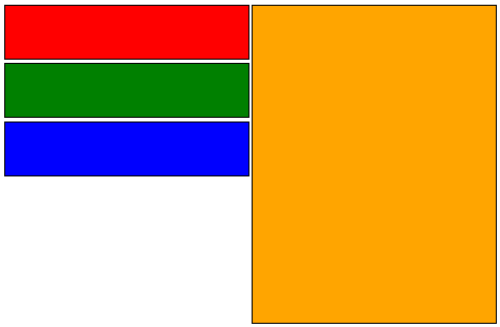
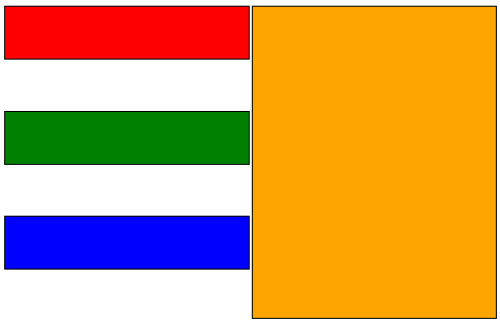
Overall effect is quite seamless

WHDG: Give Grouped columns correct captions

If you work with Infragistics WebHierarchicalDataGrid and try to use its grouping features, you may notice that it uses grid column keys instead of column header’s captions to name items in “Group By” area.

To work around this limitation, let’s take a look at how Grouped By area is rendered:

Group By Area in WebHierarchicalDataGrid

Basically a container DIV holds a bunch of SPANs representing grouped columns. Both DIV and SPAN can be located by their CSS class (your own, if it’s assigned or Infragistics StyleSet class name, used by the grid control). Knowing the location of the SPANs we can loop thru them altering their text:

function renameColumnsInGroupByArea() {

   //locating GroupBy area DIV 
   var oGroupArea = document.getElementsByClassName('ighg_IGGroupArea')[0]; 

   //locating GroupedColumn SPANs
   var aGroupedColumns = oGroupArea.getElementsByClassName('ighg_IGGroupedColumn');

   // looping thru SPANS with grouped columns, replacing their text
   for (var I = 0; I < aGroupedColumns.length; I++) {
      aGroupedColumns[I].firstChild.nodeValue = // put your new value here;
   }
}

One way of using this function is generate a JavaScript associative array (ColumnData['ColumnKey'] = 'Column Caption') in ASP.NET server side code. Armed with such array Line 11 in the previous code could be simple

aGroupedColumns[I].firstChild.nodeValue = ColumnData[aGroupedColumns[I].firstChild.nodeValue]

Solution: WebDataGrid loses styles after postback

Infragistics WebDataGrid control offers very flexible styling option – you can set font, color, size of almost any element from column to individual cell. Here is an example of basic markup that sets CSS classes of overall grid control, grid header, grid odd row and grid even row:

<ig:WebDataGrid ID="xMyGrid" runat="server"
   CssClass = "GridStyle"
   HeaderCaptionCssClass = "GridHeaderCellStyle"
   ItemCssClass = "GridCellStyle"
   AltItemCssClass = "GridAltCellStyle" 
>

And corresponding example of CSS class for even row:

tbody > tr.GridAltCellStyle > td
{
   font-size:11px;
   font-weight:normal;
   font-family:Verdana, Geneva, sans-serif;
   height:20px;
   padding: 2px 2px 2px 2px;
   border-bottom: none;
   border-right: 1px solid rgb(190,198,178);
   background-color:rgb(240,240,240);
}

(For a complete grid styling reference take a look at this styling guide)

And it all works fine, your grid renders so beautifully, Picasso would cry. But only on initial page load. And here comes dreadful postback. Continue reading →

HTML Table RowSpan: Autofit spanned cells to content

Let’s say you have created an HTML table with following markup:

<table id="xMyTable" style="width:100%;">
   <tr >
      <td style="vertical-align:top">
         <div style="border: 2px solid black; background-color:red; height: 100px;">
         </div>
      </td>
      <td style="vertical-align:top" rowspan="3">
         <div style="border: 2px solid black; background-color:orange; height: 600px">
         </div>
      </td>
   </tr>
   <tr>
      <td style="vertical-align:top">
         <div style="border: 2px solid black; background-color:green; height: 100px">
         </div>
      </td>
   </tr>
   <tr>
      <td style="vertical-align:top">
         <div style="border: 2px solid black; background-color:blue; height: 100px">
         </div>
      </td>
   </tr>
</table>

It’s very basic, one rowspanned cell that holds a content with large height on the right and 3 corresponding cells with content of smaller height on the left. You’d expect it to look like this:

Desired layout of rowspanned HTML table

Unfortunately as is it works only in Google Chrome. In the rest of the browsers, including Interned Explorer and famed FireFox it looks like this:

Current layout of rowspanned HTML table

What happens is browsers automatically spread spanned cells height to evenly fit height of the cell with rowspan. To rectify this situation we need a little help from JavaScript. Continue reading →

Partially hide external content with CSS overflow

If you ever hosted a content from external website in an IFRAME on your own site and wanted, for no reason whatsoever, to hide either top, bottom, left or right portion of that content – there’s an easy way.

Imaginge you have HTML markup like this:

<iframe frameborder="no" width="275" height="95" src="https://www.google.com/images/srpr/logo3w.png" />

It will display a pretty logo of some 3rd party company:

Now you got an idea to improve it a bit, by removing unneeded characters. Take a look at following markup:

<div style="width:275px;overflow:hidden">
   <div style="margin:0px 0px 0px -120px">
      <iframe frameborder="no" width="275" height="95"
      src="https://www.google.com/images/srpr/logo3w.png" />
   </div>
</div>

Our IFRAME is now enclosed into 2 DIVs. Internal one shifts left margin of its content 120px into the content, and external one effectively hides everything outside the margins via hidden overflow. The result:

Of course the content doesn’t have to be IFRAME with external content, but if it’s internal to your site that means you have full control over it and don’t need to use this hack.

Style Rounded Corner images of UltraWebTab thru external stylesheet

Infragistics UltraWebTab control offers multiple styling options, many of them can be set via external CSS classes. As a matter of fact about only element you cannot style via external stylesheet is rounded corner images. Or can you?

By default images used to give the tabs rounded-corner look are referenced directly in UltraWebTab ASPX markup:

<RoundedImage
   SelectedImage="./images/ig_tab_selected.jpg"
   NormalImage="./images/ig_tab_normal.gif"
   HoverImage="./images/ig_tab_hover.jpg"
   FillStyle="LeftMergedWithCenter">
</RoundedImage>

So, for example if SelectedImage looks like this:

Default Selected Image of UltraWebTab

It will give your tab appearance like this

Selected Image of UltraWebTab in action

Let’s examine it closer. Continue reading →

UltraWebGrid TopItemSpacing=”Auto”: Solution for FireFox

If you’re still using classic Infragistics Controls and want to make them work in modern browsers, sometimes a little additional work is required. Hopefully this little trick will save you some time.

UltraWebGrid has a neat property TopItemSpacing, when set to Auto it automatically spreads top level menu items across the menu control, giving them nice spacing in between. Unfortunately this property seems to work in Internet Explorer only, in Firefox (and Chrome and etc.) it is ignored, rendering menu in Compact mode giving top level items crowded “too-close-for-comfort” look.

The solution is to take spacing in our own hands. Set TopItemSpacing to Compact and instead add right padding to TopLevelParentItemStyle and TopLevelLeafItemStyle elements of the menu. For example (from the markup point of view):

<TopLevelLeafItemStyle Cursor="Hand" Height="18px" BorderWidth="1px" Font-Size="8pt">
   <Padding Right="6px" />
</TopLevelLeafItemStyle>

Actual pixel value of the padding is up to your particular scenario, but the final result is top level menu items will be nicely spaced both in IE and in Firefox.