Category Archives: New Stuff

News about site and in general

Original Pebbles are getting TimeLine! (with special offers)

Original Pebble Steel with TimeLine Pebble Corporation is very well know for its visionary ideas. Ideas that kept its incredible smartwatches Pebble and Pebble Steel relevant on the market years after their release. They key to such longevity is regular software updates that bring new features to existing hardware. Multilanguage support, actionable notifications and many other fetures delighted Pebble users to no end.

This worked amazingly well so far. But now Pebble is finally on the verge of releasing new hardware as well. Color Pebble Time is scheduled (as of this writing) to be released in May and a shinier version – Pebble Time Steel is to be shipped in July. Both are getting brand new OS with time-oriented Timeline interface that will streamline the way you interact with the watch.

But what about users of existing Pebbles? Are they doomed to use obsolete devices? Continue reading →

SliderLayer for Pebble

Pebble SDK provides very cool features for programming watchapps and watchfaces. And combining them can yield very useful results. For example “out of the box” Pebble doesn’t have a slider layer – a layer that would slide in over existing information to display new one. But we have all the basic ingredients to create one:

This example uses BitmapLayer to display images, but it just as well maybe text or other items.
Continue reading →

Pebble Time: Draw transparent text over color bitmap background

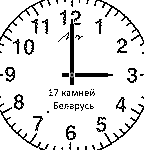
Pebble SDK has had a feature allowing to combine 2 images with transparency for a while via different composition modes. Unfortunately this doesn’t apply to texts, so, for example, if you need to display transparent time over bitmap background – you had to draw time digits as custom bitmaps. What’s worse – composition modes do not apply to colors, the result is always black-and white.

But there is a way. Pebble allows you to capture graphics context of a layer as a standard bitmap in the layer update callback. You can access that bitmap as raw data. So if you have another bitmap with the background you want to show through current layer, all you have to do is copy it byte by byte into captured bitmap, but only if pixel of specified color, that you use as a mask is encountered.

For example if your current layer needs to show background bitmap “s_bitmap” thru whatever is drawn in white color (255) you can use following snippet:

GBitmap *fb = graphics_capture_frame_buffer_format(ctx, GBitmapFormat8Bit);
  
uint8_t *fb_data =  gbitmap_get_data(fb);
uint8_t *background_data =  gbitmap_get_data(s_bitmap);
  
for (int i=0; i < 144*168; i++) {
  if (fb_data[i] == 255) {
    fb_data[i] = background_data[i];
  }
}
    
graphics_release_frame_buffer(ctx, fb);

Here Line 1 captures context as a bitmap, Lines 3-4 access captured bitmap and background bitmap as raw data. Lines 6-10 loop thru the captured data (each pixel takes a byte and in this example we’re going thru full 144×168 screen). If pixel of a white color is encountered – it is replaced with pixel from the same address of the background bitmap. And finally Line 12 releases captured framebuffer.

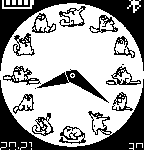
And if you combine this approach with APNG support that Pebble Time features, you can even create animated texture for your texts.

UPDATE: Thanks to @Jnm for this tip: If your masking layer is black-and white (00 & FF) that entire IF block can be replaced with bitwise AND:

fb_data[i] &= background_data[i];

And effect will be the same.

UPDATE 2 You can further optimize this code in 2 ways: First, let’s say your mask begins at Y = 50 and ends at Y = 100 – you don’t have to loop thru entire screen – you can use the loop below. It also demonstrates how you can jump 8 pixels/bytes at a time by utilizing 64-bit type:

uint64_t *fb_data = (uint64_t *)gbitmap_get_data(fb);
uint64_t *background_data = (uint64_t *)gbitmap_get_data(s_bitmap);
  
for (int i=50*144/8; i < 100*144/8; i++) {
  fb_data[i] &= background_data[i];
}

Thanks rajrdajr for the tip!

Useful Links:

Pebble: How to autoscroll large text

Last time i described how to load random string from resource. If you recall the code ended up with the line

text_layer_set_text(s_textlayer_quote, (char *)quote);

to display loaded text on the screen. But what if text is too large to fit on the screen? If you’re building a watchface, there’s no scrolllayer with user interaction available. But what we can do is automatically scroll the text for user convenience to gradually reveal entire content.

The trick is to create text layer larger than it’s container. In my case I am displaying text full screen on Pebble window which is 144×168 pixels, but I will create text layer with the height of 2000:

#define WINDOW_HEIGHT 168
#define WINDOW_WIDTH 144  
#define TEXTBOX_HEIGHT 2000
...
s_textlayer_quote = text_layer_create(GRect(0, 0, WINDOW_WIDTH, TEXTBOX_HEIGHT));

If the loaded text is larger then container window we now can dynamically detect the difference:

text_layer_set_text(s_textlayer_quote, (char *)quote);
  
// if height of quote > height of window, initiate animation to scroll
GSize text_size = text_layer_get_content_size(s_textlayer_quote);
int number_of_pixels = WINDOW_HEIGHT - text_size.h;
if (number_of_pixels < 0) {
    animate_quote(number_of_pixels);
}

Here we get dynamic size of loaded text content and if the difference between window height and actual text height is negative – call animation function, passing number of pixel we need to shift by.

Now to animation function. Continue reading →

Pebble: How to load random string from resource

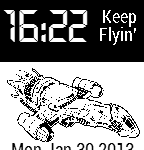
There’s no doubt that Firefly is a greatest TV series in the history of all creation. That is why when I was learning resource handling in Pebble SDK I have decided to create a watchface that would display a random quote from Firefly. And thanks to Bill Hatcher of http://cubemonkey.net/quotes/ I obtained a plain TXT file with almost 500 quotes.

The file is in the format "quote1%quote2%quote3..." e.g. there is a “%” separator between the quotes, so I quickly wrote a small script that gives me a position of each percentage sign within the file, so I can create an array of the positions in my C code for Pebble:

#define NO_OF_QUOTES 472
int aQuotePointers[NO_OF_QUOTES] = {0, 206, 354, 417, 480, 554, 662, 695,... 88825}

which basically gave me position of each quote in the file and which I prepended with 0 and appended with filesize. Then I added the resource to my project (in CloudPeble environment it’s as easy as loading a BLOB resource and giving it a name). A Pebble watchface or watchapp can handle resources of up to 96K, fortunately file with quotes was less, otherwise some kind of string compression would have to be implemented.

After that it’s a trivial matter to generate random position, retrieve quote from that position and display it on a text layer:

// determining number of quote (that will give us address of begining and end)
srand(time(NULL));
int number_of_quote = rand() % NO_OF_QUOTES;
  
//determining size of quote and allocating memory
int size_of_quote = aQuotePointers[number_of_quote + 1] - aQuotePointers[number_of_quote] - 1;
uint8_t *quote = malloc(size_of_quote);

//loading quote, displaying and freeing memory
ResHandle rh = resource_get_handle(RESOURCE_ID_FIREFLY_QUOTES);
resource_load_byte_range(rh, aQuotePointers[number_of_quote] + 1, quote, size_of_quote);
quote[size_of_quote] = 0; //null terminating string
text_layer_set_text(s_textlayer_quote, (char *)quote);

Lines 2-3 generate random index for the array of quote pointers
Lines 6-7 calculate size of the quote (based on position of current and next quote) and allocate memory for the quote
Lines 10-11 load range from the resource based on index and size
Lines 12-13 0-terminate the loaded range and display data on the text layer.

It’s all pretty straightforward and works like a magic and the result you can see in published watchface: Blue Sun Quotes.

Some useful links:

Next time I will describe how I handled situation when loaded quote is too long to display on a text layer

Root your Android device without flashing custom recovery

HTC Rooted
It is fairly straightforward to root an Android phone using SDK platform tools (adb, fastboot), for example this is a very nice guide how to root HTC One M8. Basically you download SuperSU superuser manager to your device, download custom recovery image onto your computer and flash it to your device via command

fastboot flash recovery your_custom_recovery.img

then reboot into newly flashed recovery and flash the SuperSU. Boom, you’re done.

The problem with this approach, once you phone receives OTA (over the air) update (e.g. new version of Android) it needs original stock recovery to install it. If you have custom recovery (e.g. TWRP) – OTA update will fail. The solution is, when you root your phone, not to flash custom recovery, but just to reboot into it without flashing. Instead of above command, use

fastboot boot your_custom_recovery.img

This command will reboot your phone into custom recovery without flashing it. Then you can flash SuperSU and after reboot your phone will be rooted and original stock recovery remains.

You can even save the original stock recovery (after you rooted the phone) in case you do need to flash custom one. This way you can have a backup of stock recovery in case you need to flash it back to install OTA update. Below steps are for HTC One M8, but other devices will have similar approach:

Assuming that your phone is connected to PC, you have correct drivers installed and USB debugging mode enable.

run  "adb shell" command on your PC
"su" (watch your phone and grant permission if needed)
"dd if=/dev/block/mmcblk0p43 of=/sdcard/stock_recovery.img"

This will copy stock recovery of your HTC One M8 into file “stock_recovery.img” on the SD Card.

Credits go to this XDA thread

Sideload APKs directly from your phone to FireTV/FireStick

ADP If you’re joining a grown crowd of cordcutters (people who disconnect their Cable TV services) you’re not a stranger to streaming. Devices like Roku and Chromecast go a long way to provide all your TV shows and movies need.

Amazon Fire TV and Fire Stick are the latest additions to the streaming gadgets. One advantage they have over other devices they run Android (albeit heavily modified). This gives you ability to install (sideload) ordinary Android apps onto these gadgets. There’re multiple tutorials on how to do it from desktop computers, but you have to download apps APKs onto desktop. Wouldn’t it be easier if you could do this directly from your phone?
Continue reading →

WriteEndObject of JSON.NET ouptuts NULL literal

JSON.NET is a very popular framework to process JSON data in .NET. We recently upgraded from v4 to v6 and noticed strange thing it started to output null to JSON strings created by JsonTextWriter object.

For example if JSON produced by v4 would look like this:

{"param1":"value1", "param2":"value2",
"someArray":[{"arrParam1": "arrValue1"}, {"arrParam2": "arrValue2"}]}

Same code, using v6, would prodcuce

{"param1":"value1", "param2":"value2",
"someArray":[{"arrParam1": "arrValue1"}, {"arrParam2": "arrValue2"}]null}

that extra “null” makes it invalid and unusable JSON.

The .NET function to create JSON writes it into a StringBuilder and is pretty straighforward.

  1. It starts with call to WriteStartObject method of JsonTextWriter
  2. Then it creates parameter name via WritePropertyName
  3. Depending on whether primitive value or raw string needs to be written WriteValue or WriteRaw methods are used respectfully
  4. Repeat steps 2 and 3 as needed
  5. Call to WriteEndObjectto finish writing.

This worked perfectly well when version 4 of Newtonsoft.Json.dll was used. After upgrading to version 6 last method – “WriteEndObject” began to output “null” to resulting JSON.

The solution is to use WriteRawValue method instead of WriteRaw – it still outputs raw string, but at the end WriteEndObject doesn’t output “null” anymore.

Solution: Lenovo Thinkpad w540 black LCD screen (only external monitor works)

I spend ungodly amount of time trying to solve this issue, there were many similar issues reported on Lenovo forums, but no solutions and contacting Lenovo support is akin jumping thru hoops of fire.

The problem began after I plugged my brand new Thinkpad w540 into external monitor and set it to mode “Extended display (monitor + built-in screen). For a while everything worked fine, but then laptop own screen went black – and nothing could revive it. The external monitor worked fine and the maddening part was – when laptop booted – Lenovo logo appeared bright and shiny on laptop own screen, so I knew graphics card was OK. I ran full Lenovo System update, I updated NVidia drivers from Nvida site – nothing helped.

Then I tried to update Intel drivers for laptop’s HD Graphics 4600 card. Intel installer refused to install them because “The driver being installed is not validated for this computer“. To bypass that I

1. Unzipped the installer package into it’s own folder (you can use WinRar to unpack actual EXE or you can download Zip version of the package).
2. Went to Device Manager, right clicked on “HD Graphics 4600 card” driver and selected Update.
3. When prompted I selected “Browse my computer for driver software”
4. Selected “Let me pick from list of Device Drivers”
5. Clicked “Have disk” and browsed for an INF file inside of GRAPHICS folder of the unpacked driver files from Step 1

Installation commenced and lo and behold – laptop’s display sprang to life.

These instructions are specific to this laptop model and videocard, but I imagine they might be helpful in other similar situations. And hopefully Lenovo will take notice and finally update their drivers.